How To Build Workflows In JD Edwards Release 23
JD Edwards has always provided some standard workflows for users, for example the Purchase Order Approval workflow. Recently Oracle has provided two new approval workflows; one for voucher approval and a workflow to approve bank account details.
Oracle have also made it much easier to create and trigger your own workflows, without the need for a fat client or JD Edwards developer. There is still a little bit of technical work required, but it is minimal.
How To Build JD Edwards Workflows, A Demonstration
Watch this recording from Oracle’s August 2023 Applications Unlimited Event, where Anne Thiele demonstrates all the steps involved in building a JD Edwards Workflow using Intercompany Invoicing as the example.
JD Edwards Workflow for Intercompany Invoicing
Consider the workflow for intercompany invoicing. Company A needs to invoice company B for management fees.
To do this your Accounts Receivable department raises the invoice in company A. They then pass the paperwork to a manager who approves the paperwork and passes it on to Accounts Payable who enter the AP voucher in Company B. This is obviously an oversimplified process, but let’s say that’s the whole process.
There are many issues that can arise this process. For example; paperwork might be misplaced so the invoice is not approved, or the voucher is not created. This leads to the inter-companies not reconciling. In another example the voucher is entered, but it is entered into the wrong company, or for the wrong amount, which again leads to reconciliation issues.
Build A Simple Intercompany Invoicing Workflow In JD Edwards
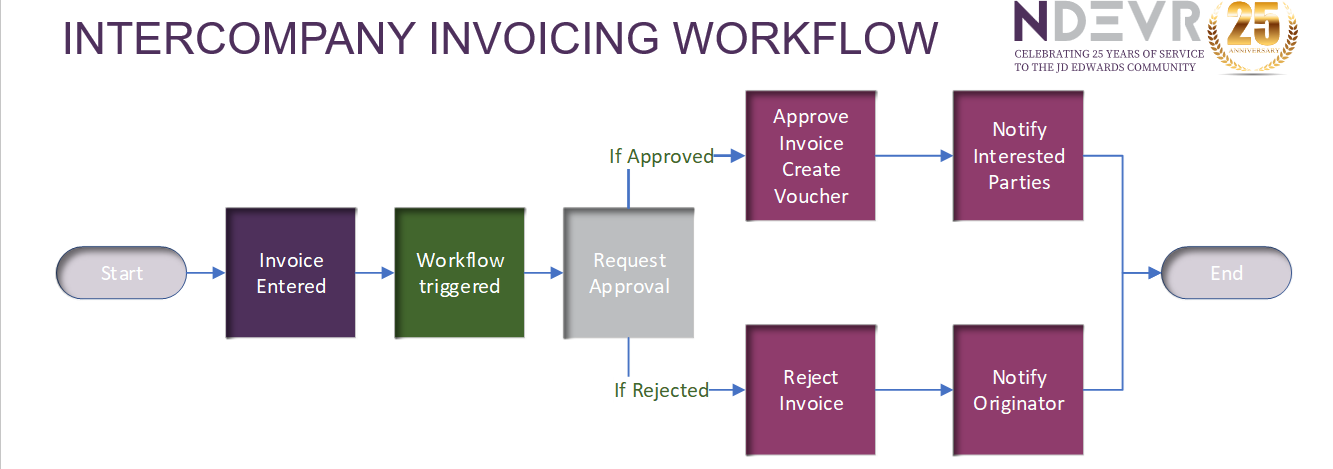
- First the invoice is entered.
- Then the invoice information is sent to the workflow and the workflow is triggered
- A message is sent to the approver requesting approval.
- If the approver approves the invoice, the invoice status is changed to approved, the corresponding voucher is created, and any interested parties are notified.
- If the approver rejects the invoice, the invoice status is changed to rejected and the originator is notified so it can be corrected.
The Workflow Components
To build the workflow requires various components:
First there are some data structures required. This is where things get a little bit technical. The data structures are where we define the information needed for the workflow.
There are 2 data structures required:
- A key data structure which is what makes the instance unique (similar to a unique key on a table).
- An additional data structure which holds all the other information you might need in the workflow process.
You can use existing data structures or define new ones.
In our webinar I show you the two data structures to support the intercompany invoicing workflow: The Key Data structure has the key for the invoice and the alternate data structure has the other information needed including the information needed to display on messages and to create the voucher.
Although the data structures are defined in Web OMW, they still need a package build and deploy. You may need to enlist the help of IT. If that’s not an option, you can always contact us for JD Edwards Support or Managed Services.
Next we need to set up the messages we will need. You can set these up via the data dictionary, or again, via Web OMW.
Then set up a pair of orchestrations to do the work.
OR_INTERCO_VOUCHER: I used the process recorder to record entering a voucher and I created a logic extension to set the pay status.
OR_RJECT_INTERCO_INVOICE: This sets the pay status to rejected.
The last step is a notification, so the interested parties are alerted once the voucher is created:
NOT_INTERCO_VOUCHER_CREATED: I have also subscribed to this notification.
Watch The Demonstration
Watch this recording from Oracle’s August 2023 Applications Unlimited Event, where Anne Thiele demonstrates all the steps involved in building a JD Edwards Workflow using Intercompany Invoicing as the example.
Your Finished Intercompany Invoicing Workflow
Let’s put it all together:
First, you’ve defined the key and additional data structures, then you’ve designed the flow:
- The approval message is sent, and the workflow waits for a response.
- Then, if it is approved, the orchestration is called to create the voucher. After the voucher is created, a message is sent, and a notification sent.
- If it is rejected, the rejection orchestration is called and then an information message is sent to the originator.
Lastly, we need to trigger the workflow when an invoice is entered.
To do this, create another logic extension which checks to see if there is an intercompany invoice. This then updates the pay status to indicate that it needs approval and triggers the workflow.
This workflow is then attached to the Invoice Entry via form extensions.
Now, although this workflow process happens behind the scenes, there is an audit trail of what happens in the Process Task Monitor. You can see the unique key (this is what was passed through to the workflow in the Key data structure) and if you expand, you can see each step in the workflow and what happened.
This is an example of a very simple workflow, but you can build this out to a more complex one including multiple approvers, multiple tasks, escalations, and delegations.
It should be mentioned that even though Workflows within Orchestrator Studio have been around for a while, some of the features in use here are only available in Release 23.


